


How-To: Labor Day Cake Pops!
- Aug 20, 2015
- 5 min read
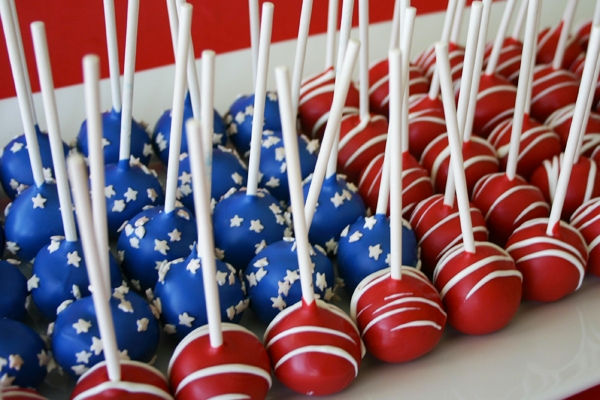
These adorable, themed cake pops are perfect for Labor Day, Memorial Day, and 4th of July. The best part...they taste as good as they look!
Step 1: Gather Your Ingredients
For this project, you'll need the following:
A baked cake of your choice, at least 8" or larger.
1/3 cup of buttercream icing (more if you are doing a larger cake)
Red, white, and blue candy melts
¼ cup Crisco
Lollipop sticks
White star sprinkles or white nonpareils
3 small bowls to melt your candy melts in
1 squeeze bottle with a narrow tip
2 cookie sheets lined with a silpat or parchment paper
1 large bowl for your cake
1 spatula
Measuring cups
Let's Get Started!
Step 2: Prepare Your Cake
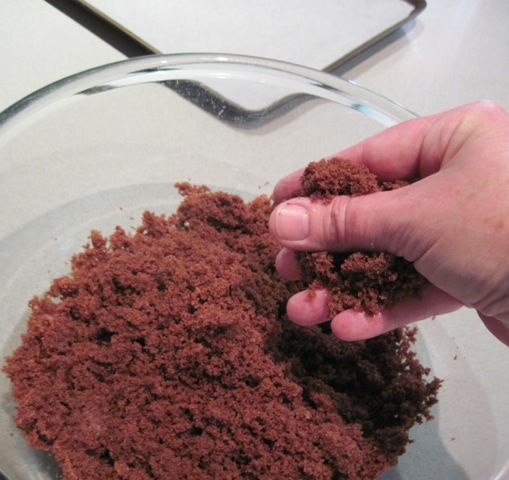
Make sure your cake is cool and out of the pan. There are many ways to crumble cake but what I find easiest is to use the cake itself! Take two large pieces of cake and rub them against each other. This crumbles the cake pretty effectively and if any large chunks are left, a fork will easily take care of them. If you have a large food processor, you can use that too but I found certain cakes are moister than others and can ball up in a processor.
Once all your cake is crumbled, add your icing starting with a couple tablespoons at a time. Too much icing will make the cake pops heavy and they could fall off the lollipop sticks when you dip them. Mix the cake thoroughly as you add icing until it sticks together without falling apart. You want your cake to hold the ball shape but not crumble otherwise you'll have pieces of cake in your candy melts.
Step 3: Shape the Cake Pops
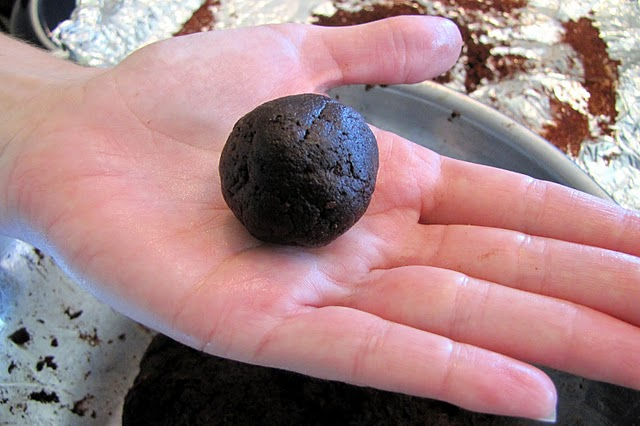
After you have mixed the cake crumbs and the icing together, it's time to make those adorable, round cake balls. Before you can roll, you need to prepare one of your cookie sheets by lining it with your silpat or parchment paper. Now that we've done that, let's talk size. The cake pops should be about as large as a quarter. Remember, the candy coating will make them larger. Gather some cake in your hands and start rolling the cake into cake balls, using slight pressure to make sure the balls don't fall apart. You need 55 cake pops to complete this project.
↑ That cake ball was a little large so I had to re-roll it.

Once you have them all rolled out, you need to put them in the fridge for at least an hour, overnight if possible. This will solidify the buttercream and bind the cake together.
Step 4: Inserting the Lollipop Sticks and Dipping
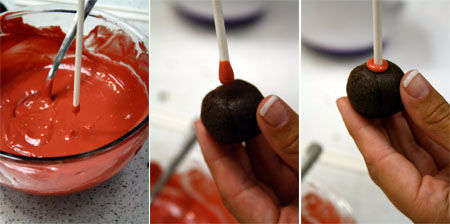
Once your cake pops have been in the fridge, it's time to put the lollipop sticks in. The secret to success here is to dip the sticks first. Take one of your small bowls and the red candy melts. Reserve 35 candy melts for later. Melt the rest of the candy melts in the microwave in increments of 30 seconds so they don't burn. Be sure to stir before adding another 30 seconds. Once they are melted evenly, dip about a ¼ inch of your lollipop stick into the candy melts and insert it into the cake ball about ½ inch. You're going to do 35 red cake balls. Once you have finished putting the sticks into the red cake balls, they need to go back into the fridge for at least another 30 minutes.
Repeat this process for the other 20 cake balls using the blue candy melts. Reserve 20 candy melts for later.
When the cake balls are ready to be dipped, prepare your other cookie sheet by lining it with either a silpat or parchment paper. Place your reserved candy melts on the cookie sheet, flat-side down, lined up about 1½ inches apart. These will be the feet of your cake pops and will make sure no cake is showing when you lift them off to eat them. If you need to, re-melt you candy melts. I prefer to thin out the candy melts to make it easier to coat. To do this, add a couple tablespoons of your Crisco to the hot candy melts and mix it in until it's melted. Add more if it's still thick until it just coats the back of a spoon. *The term for this is Nappé* Now you're ready to dip!
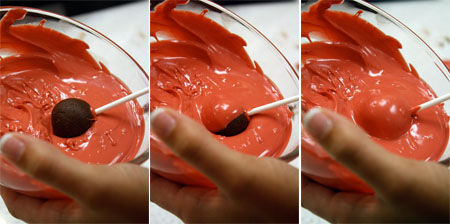
The trick to dipping cake balls and keeping them on the stick is to keep them moving. Begin by holding the lollipop stick at the end with your dominant hand. You don't want your cake ball to hit the side of the bowl so if necessary, tilt the bowl with the other hand to concentrate the candy melts to one area. Start to spin the cake ball slowly while dipping into the candy melts, allowing the candy melts to cover the cake ball completely. While still spinning the cake ball, bring it out of the candy melts. Use your other hand to gently tap the hand holding the cake ball while spinning the cake ball to knock off the excess. When it's no longer dripping and beginning to harden, set the cake pop down on top of a candy melt. Finish all the red cake balls and place back in the fridge for another 15 minutes or so, until hard.

Before you begin the blue cake pops, make sure you have your sprinkles ready to go. Repeat the process for the blue cake pops. After you place each one down on the cookie sheet, add your sprinkles while the candy melts are still wet. These can go back into the fridge to harden alongside the red cake balls.
Step 5: Decorating and Plating
Now it's time to finish decorating the red cake balls. Grab your last small bowl and the white candy melts. Melt about half the bag, using 30 second increments like before. Add a couple tablespoons of Crisco to thin out the candy melts. Once it's thin enough to coat a spoon, pour the candy melts into the squeeze bottle. Squeeze a thin line of white candy over the red cake balls. Move back and forth, going in the same direction each time, until you have decorated each cake ball. Put the cake balls back in the fridge for another 5 minutes or so until the drizzle has hardened.
The best way to display these is on a rectangular plate or cake board. Place the blue cake balls in 4 rows of 5 pieces in the upper left corner. Right next to the blue cake balls, place 35 of the red cake balls in 4 rows of 6 pieces. The remaining red cake balls go below the red and blue cake balls in one row along the bottom.
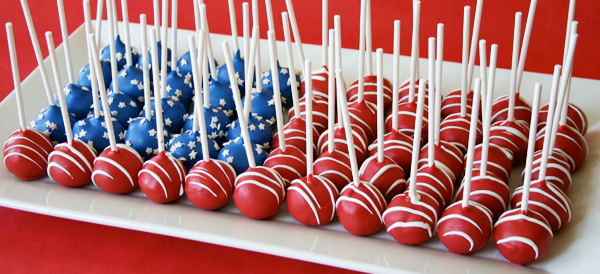
These cake pops are perfect for Labor Day, Memorial Day, or the 4th of July to celebrate those that work so hard to support our country and our families. Show the special people in your life that they are appreciated with this super delicious and adorable recipe!


Comments